Functions: Let you feel easy to check leakage on radiator or its cap, test radiator pressure, achieve a vacuum in radiator, change coolant, and measure temperature.
Upgraded Version of 28PCS: Different from the 28PCS, our kit comes with a Metal Universal Adapter, 3PCS Rubber Adapter Sleeves for water tank mouth, and a Aluminium Radiator Cap Test Adapter.
Better Compatibility: Suitable for most domestic and import vehicles. A perfect kit for DIY.
You Will Get: 17x Different Color Radiator Adapters, 4x Radiator Cap Testing Adapters, 3x Rubber Adapter Sleeves for water tank mouth, 2x Universal Adapters, 1x 0-35psi/0-2.5bar Radiator Pressure Tester, 1x 0-200??/32-400?H Stainless Steel(SS) Temperature Gauge, 1x Vacuum Purge and Refiller, 1x Plug for European Style Cars, 2x Clear Hoses (24″ and 60″), 2x Plastic Connectors (Black and Blue), 1x Tool forTightening the Test Adapters, 1x User Manual, 1x Blue Suitcase.
Warranty: We provide a worry-free 16-month warranty and 24-hour friendly customer service.
Package Includes:
17x Different Color Radiator Adapters
4x Radiator Cap Testing Adapters
3x Rubber Adapter Sleeves for water tank mouth
2x Universal Adapters
1x 0-35psi/0-2.5bar Radiator Pressure Tester
1x 0-200??/32-400?H Stainless Steel(SS) Temperature Gauge
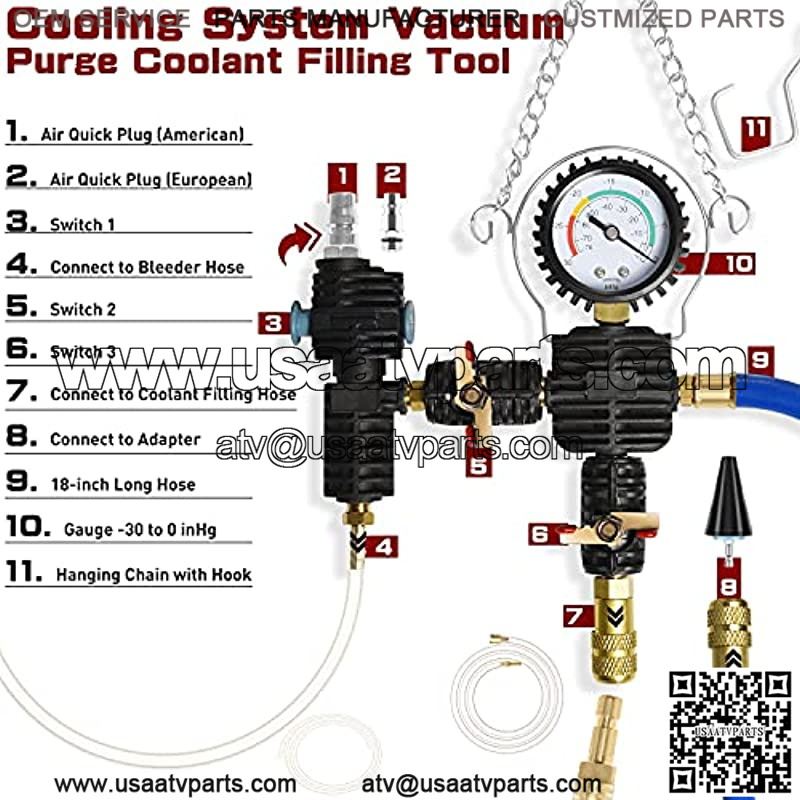
1x Vacuum Purge and Refiller
1x Plug for European Style Cars
2x Clear Hoses (24″ and 60″)
2x Plastic Connectors (Black and Blue)
1x Adapter Installation Tool
1x User Manual
1x Red Suitcase
Coolant System Leakage Test Instructions:
Open the coolant system, Before taking the coolant cap off, make sure that the coolant system is in a cold state.
Choose the right adapter according to the car model.
Tighten the adapter to the coolant system and check that the rubber ring is completely consistent.
Connect the Radiator Leakage Tester Hand Pump to the adapter.
Check your radiator cap to see how much pressure.
Pump pressure into the coolant system to the appropriate pressure.
Check the pressure gauge:
Assuming that the pointer of the pressure gauge indicator remains unchanged for a few minutes, it means that the system can be used normally.
If the indicator drops, it indicates that the system has cracks due to pressure damage.
Check whether there is any leakage in each pipeline of the water tank, and repair it according to the position of the leakage.
Check the condition of the rubber ring.
Re-test to ensure that the repaired system can be used normally.
After the test is completed, release the pressure from the Pressure Relief Valve until the pressure gauge returns to zero.
How to change the Coolant:
Lift the vehicle and drain old coolant.
Connect the drain plug back, lower the vehicle and open the hood.
Hang the Vacuum Purge Coolant Filling Tool under the hood. If necessary, adjust the length of the chain.
Connect coolant hose and drain hose to Vacuum Purge Coolant Filling Tool and check all the Switches are closed.
Choose a suitable radiator test cap and connect to connector 8 of Vacuum Purge Coolant Filling Tool.
Put Coolant Filling Hose into the coolant and make sure the hose is always immersed in coolant.
Turn on Switch 1 and Switch 2. Turn off Switch 2 until vacuum is created.
Turn on Switch 3 and the coolant will be introduced into the radiator.

